Easy Enchiladas

ench 2

Yall know I love Mexican food.  While I make my fajitas and quesadillas on the regular, I wanted to have another recipe to throw into the south of the border mix. Enter these easy enchiladas. I call these easy because they really are. Some of the recipes I was looking at seemed really complicated and lets be real here, between work and grad school, barely have time to breathe let alone cook so I’m all about quick and easy recipes that are still homemade and tasty.

A note about this recipe, it makes enough for two 9×13 casserole dishes so its the perfect freezer meal. I usually make one for dinner and then freeze the other for a busy night. I also use flour tortillas but corn would work well too – I just don’t like the texture. One final note, please pam your pan because these babies can stick!

ench 1

Easy Enchiladas

Ingredients
– 12 flour tortillas shells (6” shells)
– 2-3 cups of Mexican chicken
– 1 jar or large can of enchilada sauce
– 24 oz of Monteray-jack cheese
– 1 can of re-fried beans
– 1 can of black beans, drained and rinsed

Directions
Grease each casserole dish and pour a thin layer of enchilada sauce in the bottom of the dish.

Lay a tortilla shell flat and smear a spoonful of refried beans down the diameter of the shell. Sprinkle a spoonful of black beans on top of the refried beans. Add about a 1/4 cup of salsa chicken on top of the beans and cover with cheese.

Roll up the filled tortilla shell and lay seam-side down in the casserole dish. Lay 6 enchiladas in each casserole dish.  Pour the remaining enchilada sauce over the enchilada’s, especially around the sides of the pan and between the enchiladas. Sprinkle with more cheese.

Bake at 375° for 30 minutes or until bubbly and golden brown.

Top with sour cream and enjoy!

Much Love,

M

Asian Glazed Salmon

asian glazed salmon

I try to make some sort of fish dinner about once a week because the Omega 3’s in fish like salmon are great for lowing cholesterol, preventing migraines, and a slew of other health benefits! Fish can get boring so I always have to find ways to jazz it up, like I did with the Blackened Salmon Caesar Salads.

I had seen several recipes for a soy glazed salmon floating around on Pinterest but they all ended up with the ingredients of just soy sauce and brown sugar and that just seemed too boring and bland. I really like Asian food so I always have a few key Asian ingredients on hand  for some of the other recipes I make.  I decided to take the base of the Pinterest recipes (soy and brown sugar) and add some sesame oil, rice wine vinegar, garlic, and ginger to bump up the Asian flavors! And baking the salmon in a foil pack helps lock in all the great flavors and keeps the fish super moist!!

Asian Glazed Salmon

Ingredients

1/3 cup of low sodium soy sauce
1/3 cup of brown sugar
1/4 cup of water
1 tablespoon of grated ginger
1 tablespoon of grated garlic
1 heaping tablespoon of orange marmalade
1 tablespoon of rice wine vinegar
1 teaspoon of sesame oil
salmon fillets

Directions

Place the salmon in a foil pack and spoon over enough sauce to cover the fish, reserving some sauce for later.

Seal the foil pack up and bake for 30-45 minutes at 450° until fish flakes with a fork.

Right before serving, spoon a little more sauce over the fish.

Enjoy with some steamed rice and steamed Asian veggies!

Much Love,

M

Mom’s Country Fried Steak


country fried steak 2

In an earlier post for my Southern Chicken Fried Chicken with White Pepper Gravy, I mentioned that I grew up having a very different version of Chicken Fried Chicken or Chicken Fried Steak and called what my mom makes “Midwestern Country Fried Steak”. Don’t get me wrong, I love the traditional Chicken Fried Chicken with the white gravy but my mom’s Country Fried steak with the dark rich gravy and mushrooms is pure comfort and probably one of my favorite meals! I have always struggled to make my mom’s recipes taste like when she makes it but its very hard to do – it must be that mom cookin’! But this recipe is one of the few that I’ve been spot on with and one that I don’t change.

I usually serve mom’s country fried steak with Creamy Mashed Potatoes and peas. I think there is something awesomely nostalgic about having that traditional ’50’s dinner combination. Plus it just looks good on a plate.

country fried steak

Mom’s Country Fried Steak

Ingredients

– 1 regular package of cube steak
– seasoned flour
– vegetable/canola oil
– 1 box of fresh mushrooms, sliced
– 1 can of cream of mushroom soup
– 1 can of beef consumee
– 1 tablespoon of Kitchen Bouquet Browning & Seasoning Sauce- salt and pepper

Directions

Dredge the cube steak pieces through the seasoned flour and pan fry in a hot skillet with a few tablespoons of oil until golden brown on both sides. Put cooked pieces in a casserole dish.

In the same skillet, saute mushrooms with salt and pepper until slightly soft and pour over cooked cube steak.

Again in the same skillet, add in the beef consume and scrape and bits off the bottom of the pan. Add in the cream of mushroom soup and stir to remove all lumps. Sprinkle in a tablespoon or so of the seasoned flour. Once gravy comes to a simmer, add in the kitchen bouquet and salt and pepper to taste and cook until slightly thickened and bubbly. Stir and pour over steak and mushrooms.

Put casserole dish in a 350° oven for at least 30 minutes and up to 1 hour to tenderize the meat and thicken the gravy.

Serve with your favorite sides!

Much love,M

Southern Chicken Fried Chicken with Pepper Gravy

chicken fried chicken

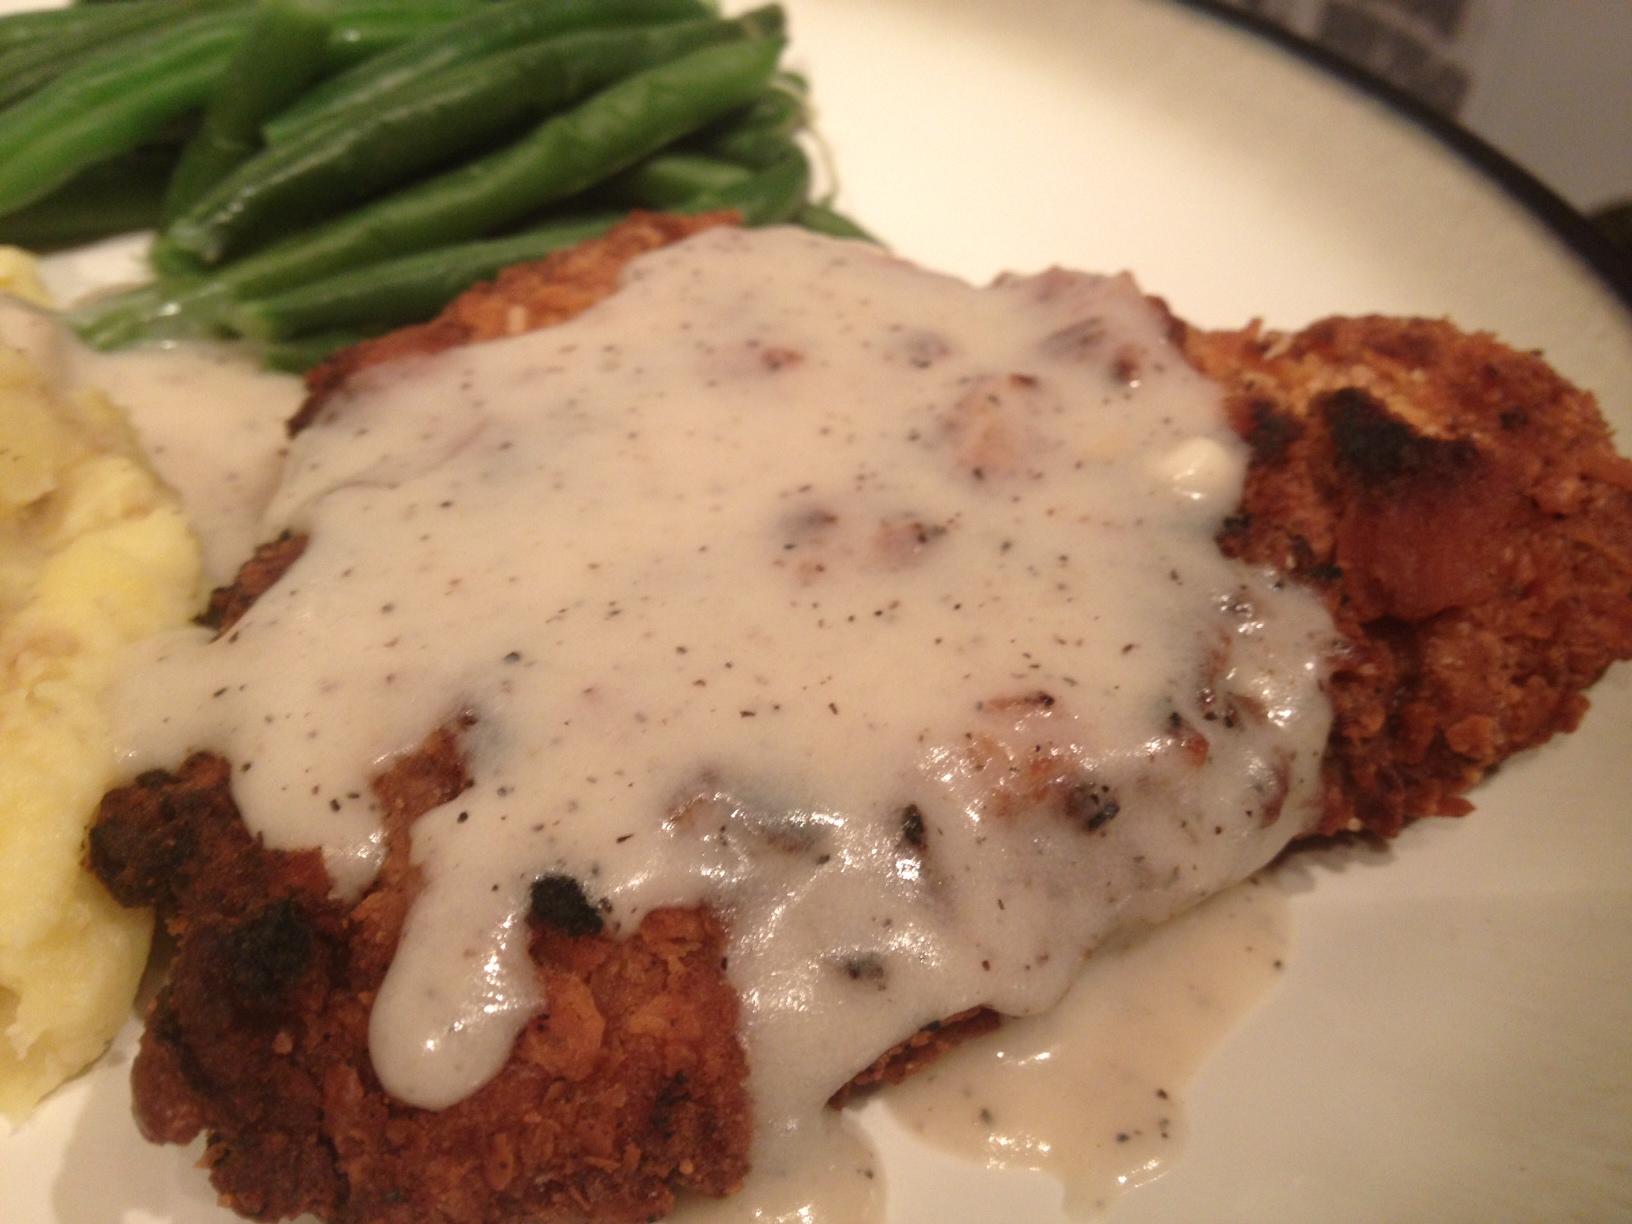
I grew up eating my mom’s country fried steak that has a dark brown mushroom gravy and isn’t really “fried”. I would definitely say it wasn’t southern so we’ll call it Midwestern Country Fried Steak. Having had nothing but this, the first time I ordered Country Fried Chicken/Steak from Cracker Barrel I was shocked to see this white gravy on top but it was tasty! I’ve had various versions of country Fried Chicken/Steak with sawmill (now I know what its called) gravy and really like it. One weekend (when I do all my experimental cooking now that I am in grad school) I decided to make my own. I took to the internet for recipes. Finally I settled on a collection of recipes from Southern Living (cant go wrong there) and decided to compile a bit of each good looking recipe.

I don’t normally do to much frying. One, because I didn’t grow up with anything fried really (heck my mom’s fried chicken was “Oven Fried Chicken”), two, because its not that healthy for you, and three, the last time I tried to fry chicken, I caught the stove on fire three times. Yea, mostly #3… So this time I made sure to do a few key things: make sure the oil is not too hot (never above 350°), have enough oil so the chicken can “float” and not touch the bottom of the pan but not too much that it overflows, and use smaller, thinner pieces of chicken.

Now only making this recipe one time, I can definitely say that the key to this recipe is the pepper! But seriously, it is! Make sure to season the chicken, season the dredging, and for Pete’s sake season the gravy!

One final note and then we’ll get to the recipe, this is actually a lot easier to make than you would think. Also, I think there is some requirement where you have to serve this with mashed potatoes and green beans.

Southern Chicken Fried Chicken with Pepper Gravy

Ingredients– 4 6oz chicken breast portions
– 1 sleeve of crackers, crushed (saltines preferred)
– 1 cup plus 1/4 cup of flour
– 1 tsp. baking powder
– 2 eggs
– 2 cups milk
– canola or peanut oil for frying
– hot sauce (Texas Pete preferred)
– salt and pepper to taste
Gravy
– 3 1/4 cups milk
– 1/3 coups flour
– 2 tbsp. butter
– salt and pepper to taste

Directions

Place the chicken breasts on a cutting board and cover with wax paper or plastic wrap. Use a rolling pin and flatten to about 1/4” thickness. Cut in half and sprinkle each side with salt and pepper.

Set up the breading station using 3 dishes. In the first dish combine the 1/4 cup of flour and salt and pepper. In the second dish combine the 2 cups of milk and the 2 eggs. Whisk together and add hot sauce and salt and pepper. In the third dish combine cracker crumbs, 1 cup of flour, baking powder and salt and pepper.

In a cast ion skillet, add oil to about 1” (no more than half way up the pan) and heat to no more than 350 degrees (345° is perfect).

While oil is hot, dredge each piece of chicken through the flour, milk/egg mixture, then through the cracker mixture and set aside.

When oil is hot and to temperature, fry each piece of chicken (do not put more than 3 or 4 pieces in the skillet at a time. Fry each piece until golden brown on each side (just a few minutes per side).

Once golden, remove chicken pieces to a baking rack set on a baking sheet. Keep fried chicken in a 300° oven to keep warm and finish cooking all the way through.

In a separate skillet over medium heat, melt butter. In a bowl combine other gravy ingredients and whisk well. When butter is melted, add the milk/flour mixture. Continue cooking over medium heat for 10-15 minutes or until thickened, whisking constantly.

When gravy is thick and bubbly, remove chicken from oven and check to make sure its cooked through. Top with gravy and serve immediately.

Enjoy!

Much Love,

M

Easy Chicken and Dumplings

dumplings
Now that we are starting to have some cold nights, nothing sounds better to me than a warm bowl of chicken and dumplings! My mom never made this growing up but I’ve had it at a few “southern comfort food” restaurants and have always loved it. I had thought and heard that chicken and dumplings was really difficult but after looking over several recipes, I thought it was something I definitely could manage. I actually would consider this recipe an easy version! For the sake of time I’ve decided to take a few shortcuts to the more traditional recipe, such as buying a rotisserie chicken, but by all means, if you have the time to sear and slow cook a whole chicken, knock yourself out. I really couldn’t taste much of a difference, or at least not enough to make me want to bother with a fryer chicken. HA!
Easy Chicken and Dumplings
Ingredients
1 rotisserie chicken, meat pulled from bones and cut into pieces
2 celery ribs, sliced
4 carrots, peeled and sliced
1 medium onion, diced
3 tablespoons of butter
8 cups of low sodium chicken broth
2 tablespoons parsley
2 teaspoons chicken bouillon granules
salt and pepper to taste
water if needed
splash of cream
1 bag of frozen peas
Dumpling Dough
2 cups flour
4 teaspoons baking powder
1 teaspoon salt1 teaspoon of poultry seasoning
3/4 cup milk
4 tablespoons vegetable oil

Directions

Combine celery, carrots, onion, with the butter in a dutch oven and cook until slightly softened. Add chicken broth, parsley, chicken bouillon granules, salt and pepper and bring to a heavy simmer.Add chicken pieces to the warm soup and bring back to simmer.In a mixing bowl, combine dumpling ingredients and mix well to form a stiff dough. Drop by tablespoonfuls into simmering soup.

Cover and simmer for 15 to 20 minutes.

Add in bag of peas and continue cooking until peas are warm and dumplings are cooked and floating on the surface (about 5 additional minutes).

Splash in a few tablespoons of cream to he sauce and stir to combine.

Serve immediately.

Enjoy!

Much Love,

M

Fiesta Chili

chili

When I think of fall I think of warm, hearty soups. And when I think of soups I immediately think of chili! My mom makes a simple beef chili with red kidney beans. It was always very good, but simple – I wanted to jazz it up a little.

I like to use ground turkey in my chili. I think it holds up a little bit better and is better for you. I also like to use 3 different types of beans as well as add in some corn, both yellow and white for no other purpose than color variety. The seasonings in this chili I think are what make it! Chili powder is only 1 of many seasonings!

You can make this in the crock pot or you can make it over the stove. Just make sure you cook it for several hours so the flavors can mingle and develop!

One final thing to note about this recipe is that you do not drain any of the cans, including the beans! This chili uses the starch and syrup in the beans to help thicken it. This really is a dump and stir kind of a soup!

Ingredients

– 1 large onion, diced
– 1 lb ground turkey (beef or chicken would work too)
– 1 can of red kidney beans
– 1 can of black beans
– 1 can of pinto beans
– 1 can of yellow whole kernel corn
– 1 can of white whole kernel corn
– 1 large can of petite diced tomatoes
– 1 large can of crushed tomatoes
– 1 regular can of tomato sauce
– 1 packet of ranch dressing mix
– 1 packet of taco seasoning
– 1 tsp chili powder
– 1 tsp garlic powder
– 1 tsp cumin

Directions

In a skillet, brown the meat and pour off any extra fat. Set aside.

In a large soup pot or crock pot on medium high heat, pour in the crushed tomatoes. Sprinkle in the two packets of seasons and the 2 teaspoons of other seasonings and stir to combine.

Add in the beans (undrained), corn (undrained), diced tomatoes (undrained), diced onion, and browned meat. Mix well.

Once soup comes to a low boil, reduce heat and simmer for several hours.

Top with a dollop of sour cream and some shredded cheddar cheese.

Enjoy with tortilla chips or cornbread!

Much Love,

M

Chicken & Wild Rice Casserole

wild rice

Chicken and rice casseroles are something that not only I grew up eating but my mother grew up eating too. They are super comforting and hearty and just remind me of home. I have made several different versions of this casserole but my best recipe combines my three favorites – chunky veggies, cheesy sauce, and a cracker crust. I also cheat a little bit with this recipe by using boxed wild rice but if you wanted to cook your own, feel free to do that as well – the boxed stuff just saves on time. Another shortcut would be to shred a rotisserie chicken instead of boiling/poaching/baking your own chicken.

Be warned! This is a big batch recipe and will more than overflow a regular 9×13 casserole dish. If you have a bigger dish use that or feel free to cut down the recipe. My preferred thing to do with this recipe is make two casseroles with this by separating it into 2 aluminum pans and freezing one or both of them. This casserole freezes really well (minus the cheese and cracker topping). All you need to do is let it thaw on the counter, top with the cheese, crackers and melted butter and bake as directed below.

Chicken and Wild Rice Casserole

Ingredients

4 chicken breasts, cooked and chopped into pieces
4 boxes of Uncle Ben’s Quick Cook Wild Rice, prepared according to box directions
1 large onion, diced (about 1 1/2 cups)
4-5 stalks of celery, coarsely chopped (about 1 1/2 cups)
5 carrots, peeled and coarsely chopped (about 1 1/2 cups)
vegetable oil
1 stick + 1/4 stick of butter
1/4 cup of flour
2 cups of reduced sodium chicken broth
3 cups of shredded cheddar cheese + 2 cups for topping
2 sleeves of Ritz crackers, crushed into coarse crumbs
salt and pepper

Directions

In a skillet heated to medium high, saute onion, celery and carrots until softened.

Meanwhile, prepare the cheese sauce by melting the 1/4 stick of butter into a saucepan over medium high heat and whisking in the flour, salt and pepper. Slowly pour in chicken broth whisking continuously until thick and nearly boiling then remove from the heat and stir in 2 and 1/3  cups of cheese until melted.

In a large bowl, add cooked rice, sauteed veggies,  and chicken and then pour cheese sauce over rice mixture and toss to combine. Transfer the mixture to a greased baking dish. Melt the stick of butter. Top the casseroles with remaining cup of cheddar cheese, sprinkle cracker crumbs over the casserole, and drizzle with the melted butter (1 cup of cheese, 1 sleeve of cracker crumbs and 1/2 stick of butter per casserole).

Bake at 350° for about 30 minutes or until cheese is bubbly and top is golden brown and crunchy. (If baking from room temperate time will increase to 1 hour).

Enjoy!

Much Love,
M

Parsley-Buttered Potatoes

parsley buttered potatoes 2

This is perhaps one of if not the quickest potato recipes I know. And it so good! I prefer to use baby redskin potatoes but you can use whatever you have – yellow, fingerling, etc. I also like to use a mix of butter and margarine. For the parsley, fresh is best. You can use freeze-dried if necessary but its just not as good.

Parsley-Buttered Potatoes

Ingredients

potatoes, diced with skins on
fresh parsley, chopped
butter and margarine, equal parts

Directions

In a microwave-safe bowl, add diced potatoes and a little bit of water (a few tablespoons) and microwave until soft.

Toss the cooked potatoes in the butter and margarine mixture and sprinkle with parsley.

Enjoy!

Much love,

M

Summer Squash and Sweet Onions

summer squash

Now that it is pretty much fall, I find my self still scrambling to keep the summer food thing going. One of the things I will miss most about summer produce is the squash and sweet onions. Since I life in NC where we have pretty mild seasons, there still some good quality squash and zucchini into October so now is the time to get my fill while I can. This summer side dish is so easy to make and is probably one of my favorite foods! Just be careful not to over cook the squash as its not any good when its mushy.

Summer Squash and Sweet Onions

Ingredients

– yellow squash cut into 1” pieces
– zucchini cut into 1” pieces
– sweet onion diced into 1/2” pieces
– butter/margarine
– salt and pepper

Directions

In a skillet heated to medium high heat, melt some butter/margarine and saute the onions until starting to turn clear.

Add in the squash and saute until just tender.

Sprinkle with salt and pepper and serve hot.

Enjoy!

Much Love,

M

Caramelized French Onion Dip

onion dip

Who doesn’t love chips and dip? The store bought stuff is not that great and the mix+sour cream thing gets old. I was in the mood to make something. Well as luck would have it, I was procrastinating with taking a break from my school work and wound up watching an episode of Food Network’s Heartland Table and what do you know, she makes french onion dip from scratch. I don’t know why it never occurred to me to caramelize the onions myself but I knew I had to made my spin on it! Her recipe was very simple: sour cream, cream cheese, onions, and chives. So I decided to add mayonnaise to the recipe, cut down on some of the cream cheese and bump up the flavor with some Worcestershire sauce, Dijon mustard, and thyme for some extra flavor. I don’t know why but nothing goes better together than onions and thyme. **After I’ve made this a few times I often omit the cream cheese. I also frequently sub some of the sour cream and mayo for Greek yogurt. I’ve gotten to the point where I just dump things in for this recipe but I all tastes good.

Holy smokes this dip is good. You HAVE let it sit in the fridge for 24+ hours. I swear, you will never find any other type of french onion dip in my house again!

Caramelized French Onion Dip

Ingredients
– 1 and 1/2 cup sour cream
– 1 cup mayonnaise
– 1/4 cup cream cheese, softened at room temperature
– 2 medium-large vidalia onions, cut in half and sliced
– 2 teaspoons of garlic paste or minced garlic
– 2 tablespoons of fresh chives
– 1 teaspoon of fresh thyme (optional)
– a few dashes of Worcestershire sauce
– 1 teaspoon of Dijon mustard
– salt and pepper to taste

Directions

In a cast-iron skillet heated to medium, melt some butter and cook the onions until caramelized. Remove from the skillet and allow to cool.

In a bowl, combine the softened cream cheese, sour cream, and mayonnaise with a mixer. Blend until smooth and creamy.

Once onions are cooled, roughly dice and add to cream mixture.

Stir in onions, chives, Worcestershire, Dijon, and thyme. Season with salt and pepper if needed and mix well.

Refrigerate for at least several hours or even a day or two.

Serve with kettle chips, veggies, or whatever sounds tasty!

Enjoy!

Much Love,

M