Crock-Pot Mexican Chicken

salsackn1

This Mexican chicken is really versatile and so easy to make!! I use it to make quesadillas, enchiladas, tacos, and more!

And the best part about this recipe is that its made in a crock pot!!

Crock-Pot Mexican Chicken

Ingredients

1 pound of frozen chicken breasts (I use the 4oz breast portions)

1  16oz jar of your favorite salsa (I like Pace Picante Medium)

1-2 packets of taco seasoning or 2-4 tablespoons of seasoning if you buy in bulk or make your own

Directions

In your crock pot, put in the frozen chicken breasts.

Sprinkle the taco seasoning over the frozen chicken.

Pour the entire jar of salsa over the seasoned chicken.

Cook on low for 5-6 hours or on high for 3-4 hours.

About 30 minutes before you are ready to start cooking with your chicken, take the lid off the crock pot and stir the chicken until its finely shredded.

Leave the lid off the crock pot for 15-30 minutes to let some of the moisture evaporate before you put your chicken mixture into a tortilla shell to keep it from getting soggy.

Much Love,

M

Cold Tex-Mex Succotash

succotash

Whether you are looking for a fresh appetizer or something different for a side dish, this Cold Tex-Mex Succotash is the perfect choice! I originally made this recipe as a side dish to go with some BBQ grilled chicken and homemade sweet potato fries but ended up making it again and served it with tortilla chips as an appetizer. Its soo good and soo healthy too! YUMM!

Note: This recipe calls for frozen corn but if you can get your hands on some fresh corn, please use that! If you can grill the corn, then even better! If not, you can just roast it in the oven or in a skillet. While the frozen corn works well, nothing beats the crunch of the fresh sweet corn.

Cold Tex-Mex Succotash

Ingredients

  • 2 15-oz cans of black beans, rinse and drained
  • 1 bag of frozen corn, thawed
  • 1 bag of frozen shelled edamame (soybeans), thawed
  • 1 large (or two small) red or orange bell pepper, chopped
  • 1 medium purple onion, chopped
  • 1 jalapeno pepper, seeded and chopped
  • 1/2 cup of fresh cilantro leaves, chopped
  • zest of two limes
  • 1/4 cup of olive oil
  • 3/4 cup of lime juice (I use the juice of the two fresh limes and the rest bottled lime juice)
  • 1/2 teaspoon of cumin
  • 1/2 teaspoon of garlic powder or garlic salt
  • 1/4 teaspoon of red pepper or cayenne pepper (optional)
  • salt and black pepper to taste

Directions

In a large bowl, combine corn, black beans, edemame, bell pepper, jalapeno, onion, and cilantro.

In a smaller bowl add lime zest, lime juice, olive oil, cumin, garlic, and cayenne pepper and whisk to combine.

Pour the vinaigrette over the veggies and mix well.

Refrigerate for several hours.

Serve as a side dish or with tortilla chips as an appetizer.

Enjoy!

Much Love,

M

Tye Club Grilled Chicken

tyeclub

When the weather is nice, I love to grill out for dinner. Growing up my dad always called it yard bird so I always think of that when I’m grilling chicken. BBQ chicken is always a good choice but if you are looking for something a bit different, give this chicken a try – its tangy, a bit spicy, and just down right tasty!

The recipe comes from my dad. I’m not sure its origins beyond that. All I know is that he’s been making it since before I was born and its my favorite way to have grilled chicken!

Note about this recipe: I tend to go heavy on the spices so if you prefer a more mild chicken marinade, feel free to use less. My personal opinion? Its chicken – you have to go bold or else it tastes like shoes.

Tye Club Chicken

Ingredients

  • 1 egg, beaten
  • 1/4 cup of olive oil
  • 3/4 cup of cider vinegar
  • 1 tablespoon of salt
  • 1 tablespoon of black pepper
  • 1 tablespoon of poultry seasoning
  • 1 tablespoon of Texas Pete hot sauce

Directions

Marinate the chicken for several hours or even all day if you can.

While grilling, dunk the pieces in the marinade before each flip. Dunk often!

Because raw chicken was sitting in the marinade, make sure to put the chicken on the grill for a few minutes after the last dunk into the marinade to kill salmonella or any other bacteria.

Cook the chicken until juices run clear and enjoy!

Much Love,

M

Southern Macaroni Salad

mac3

Warm weather means cook-outs and cook-outs mean yummy summertime side dishes! One of my favorite side dishes to have with grilled chicken is Southern Macaroni Salad. I didn’t grow up having this recipe or really any creamy pasta salad – which is weird for growing up in the land of mayonaise everything. But after having it at a few cookouts and BBQs as an adult I decided I could make my own version.

Keep in mind that this recipe has a high veggie to noodle ratio – that’s just how I like it. If you prefer more noodles and less veggies, feel free to skimp on the crunchy stuff.

mac1

In addition to all the veggies, you can make the recipe even healthier by using light mayo, skim milk, and low-calorie sweetener. These simple changes really cut out a lot of necessary calories while keeping the same taste.

mac2

Southern Macaroni Salad

Ingredients

  • 1 pound of elbow macaroni, cooked until just al dente, drained, and rinsed with cold water
  • 1 purple onion, finely diced
  • 1 red bell pepper, finely diced
  • 3 ribs of celery, finely diced
  • 1 cup of shredded or grated carrots
  • 1 cup of chopped sweet baby gherkins
  • 1 1/4 cup of mayo (we prefer Duke’s)
  • 1/2 cup of milk
  • 3-4 tablespoons of cider vinegar
  • 1 tablespoon of sugar
  • 1 tablespoon of Dijon mustard
  • 1 tablespoon of yellow mustard
  • 1 teaspoon of garlic salt
  • 1/2 teaspoon of black pepper
  • 1/4 teaspoon of red pepper or cayenne pepper

Directions

In a large bowl, add onion, bell pepper, celery, carrots, and gherkins. Toss in the cooled macaroni and combine.

In a smaller bowl combine mayo, milk, vinegar, sugar, mustards, garlic salt, and peppers and whisk until smooth.

Pour sauce over noodle mixture and mix well.

Refrigerate for several hours before serving.

Enjoy!

Much Love,

M

Basic Bruschetta

bruschetta

I love making bruschetta! Its so easy and so good! Most times I make it as an appetizer but I have definitely been known to eat just this for dinner too!

A few notes about this recipe: It is always best when you can get fresh tomatoes but unfortunately we don’t have those year-round so hot house tomatoes will work too. I also like to use fresh herbs when I can. I have my own herb garden at the house so in the spring and summer I just pop out back and grab some fresh basil, oregano, and thyme. If you don’t have access to fresh herbs at home or don’t want to spend the money on store bought fresh herbs, the the dried stuff will definitely work well too.

brusch2

Basic Bruschetta

Ingredients

  • 3 cups of diced tomatoes (about 3 medium-large tomatoes, or 6-8 Roma tomatoes)
  • 1/2 of a cucumber, peeled and finely chopped
  • 1/2 of a small red onion, finely chopped
  • 1 rib of celery, finely chopped
  • ~ 1-3 tablespoons of Italian herbs/seasonings
  • ~ 1 teaspoon of garlic powder or garlic salt
  • ~ 2-3 tablespoons of olive oil
  • ~ 1/4 – 1/2 of a cup of balsamic vinegar
  • baguette, sliced into 1 cm thick slices
  • olive oil
  • shredded Parmesan cheese

Directions

In a bowl, add the celery, onion, cucumber, Italian seasonings and garlic. Drizzle the olive oil and balsamic vinegar over the mixture and toss to combine. Add the diced tomatoes to the bowl and gently toss to combine as not to bruise or crush the tomatoes. Refrigerate for several hours before serving.

When ready to serve, drizzle the baguette slices lightly with olive oil and toast in a 400 degree oven until slightly golden brown.  Pull the baguette slices out of the oven. sprinkle with the shredded Parmesan cheese, and put back them back in the oven until perfectly melty!

Top the cheesy baguette slices with the herbed tomato mixture and enjoy!!


brusch3

Much Love,

M

Fresh Strawberry Pie

pie whole

I love making fresh strawberry pies in the spring and early summer! Using fresh berries allows you to really taste the great flavor of the berries themselves. Plus, this pie is kept in the refrigerator so a nice cold slice of pie on a warm evening is just perfect!

I always use fresh local strawberries for this recipe. Using the jumbo store bought berries with no taste does you no favors. So head out to your local farmers market or produce stand and get some good quality berries. In addition to paying less for better berries, you will be supporting a local farmer – win win!

Shortcuts! There are several shortcuts you can take when making this recipe. The first is to use a prepared pie crust. Yes I know how to make homemade pie crusts and yes they do taste better but sometimes, in fact most times, I don’t have time to make a crust from scratch. Bedsides, if my great grandmother said its OK to use a store-bought pie crust every now and then, then it must be alright! I do prefer the Pillsbury pie crusts in the refrigerated section. I don’t like frozen crusts (they seem too dry) and sometimes the store-brand crusts just taste like shortening. I think the Pillsbury crusts come as close as you can to homemade. Another shortcut you can take is to use a prepared strawberry glaze – you know the kind in the tubs or bags in the produce section. Sometimes, if they are on sale or  if the store is out of strawberry Jello or if I just want to be lazy, then I will go for this option. But if you are feeling a little more adventurous and have some extra time on your hands, try making this easy glaze!

Helpful Hints! One trick I’ve learned to ensure a flat pie crust is to line the crust with parchment paper and fill the dish with dried black beans. The weight of the beans keeps the crust flat and the black color absorbs the heat. After about 10 minutes in the oven, pull the pie dish out, lift up the parchment paper, pour the beans into a dish to cool, and put the crust back in the oven for two minutes  to crisp up the center of the crust. You can store the cooled beans in a zip-lock bag and re-use them again and again for this purpose.  Another helpful hint is to use a whisk when making the glaze. The whisk really helps to thoroughly combine the ingredients and keeps the glaze from sticking to the bottom of the saucepan. No one wants a lumpy glaze!

Lighten-Up! If you want to lighten up this recipe, you can substitute granulated low-calorie sweetener like Splenda for the sugar and use sugar-free strawberry Jello. You also can buy fat free Redi-Whip, which I prefer because its actually real cream and only 5 calories!

So here’s the recipe!

Fresh Strawberry Pie

Ingredients:

  • 1 pie crust
  • 4-5 cups of fresh strawberries, rinsed and quartered or sliced
  • 2/3 cups of sugar (or 3/4 cups if you have a real sweet tooth or if your berries aren’t super sweet)
  • 2 tablespoons of corn starch
  • 1 cup of water
  • 1 3-oz package of strawberry flavored Jello
  • whipped cream, for topping

Directions:

In a 9 inch pie dish, bake your pie crust according to package or recipe directions, typically at 450 degrees for 8-12 minutes, until golden brown. Make sure to use a fork and poke a few holes around the crust to avoid air bubbles.  When the crust is nice and golden brown, remove from the oven and allow to cool completely.

While the crust is cooling, prepare the glaze by combining sugar, corn starch, and water in a saucepan over medium-high heat. Bring to a boil and while stirring constantly, boil for 2-3 minutes or until thick. Remove the pan from the heat and add the Jello and mix thoroughly.  Once the Jello is well combined, pour the glaze into a glass or metal bowl and refrigerate until mostly cool.

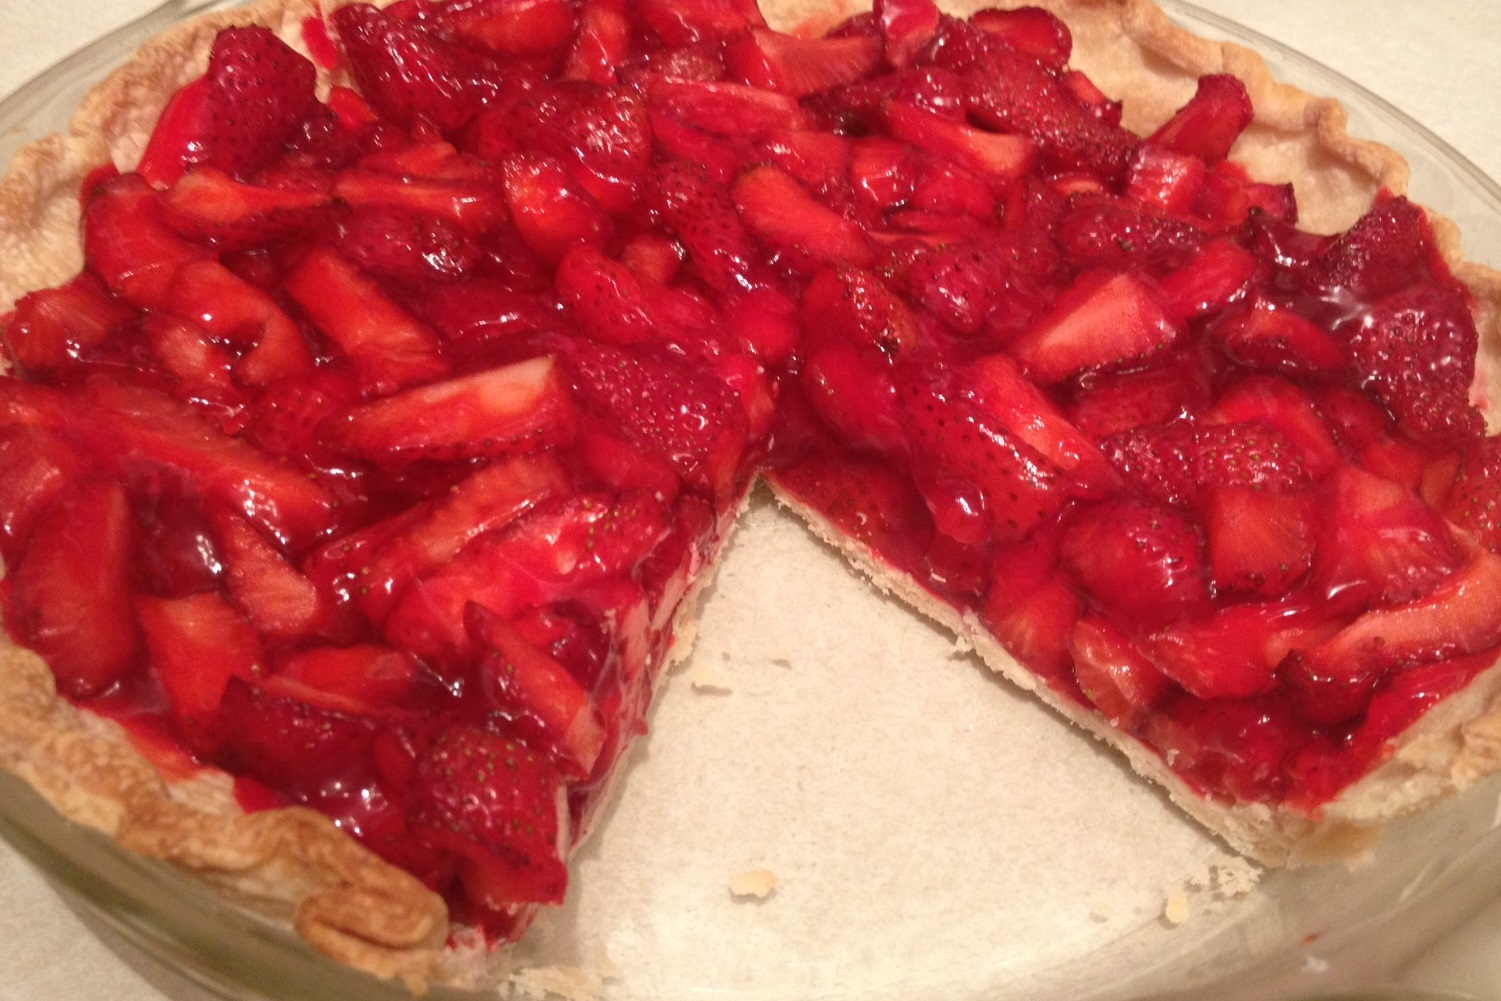
While the glaze is cooling, wash and cut up your strawberries. You can slice them or quarter them. I prefer the berries to be cut as opposed to whole but if you have cute little berries, feel free to skip this step and just lay the berries flat top down on the pie crust for a pretty effect.

Once the glaze has cooled down a bit, add the strawberries to the glaze and toss to evenly coat. Pour the berries and glaze in the cooled pie crust and refrigerate until ready to serve.

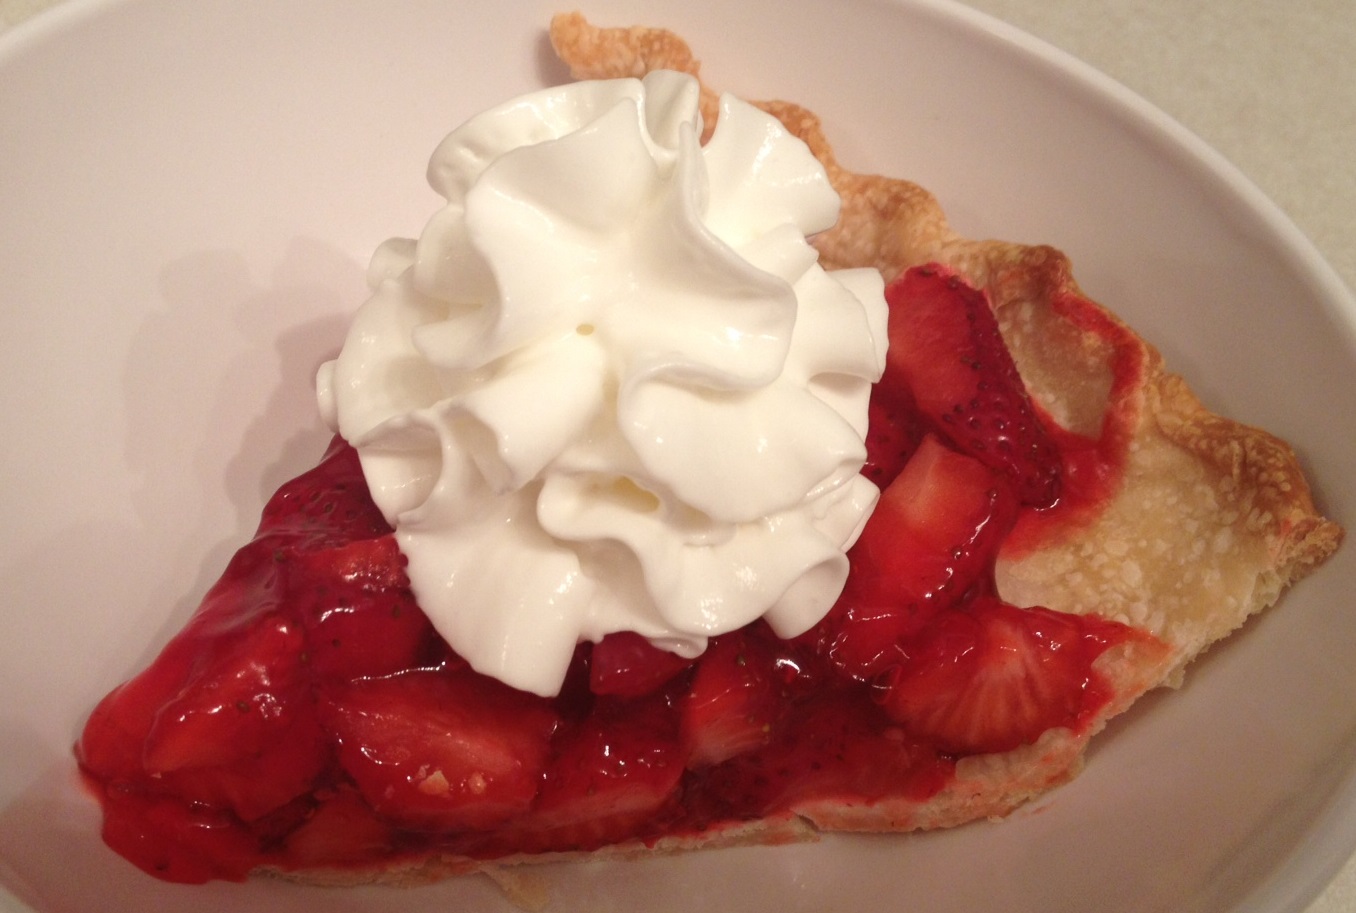
Garnish with whipped cream and enjoy!

pie slice cropped

Much Love,

M

My take on my momma’s pasta sauce

sauce

I decided my first food blog post would be the recipe for my mom’s pasta sauce (or rather my variation of it) because it is one of the first things of hers I remember making on my own.

Making your own pasta sauce is so easy and a great way to get rid of all those unnecessary preservatives and calories that you find in the jar stuff. Don’t get me wrong, for a quick dinner, grabbing a jar of sauce isn’t bad, but for a fraction of the cost, you can make a big batch of homemade sauce at home and put some in the freezer for later. And that is exactly what I do! The recipe I most often use makes a four dinner batch of sauce (and by dinner I mean enough sauce to cover a pound of pasta – and we like a LOT of sauce at our house!)  I also will post a one pot sauce recipe that is enough for two dinners – one tonight and one for the freezer!

Notes about this recipe: For the meat, I like to use lean ground beef, my mom uses a mix of beef and Italian sausage, or you could also use ground turkey to cut out some fat and calories. Instead of chopping up fresh garlic, I like to use the fresh already minced garlic found in the tubes in the produce section of your grocery store. I like to use various canned tomato products to add different textures to the sauce. Also, whenever you are cooking with canned tomato products, its always a good idea to add a pinch or two of sugar (or low-calorie sweetener) to offset the acidity of the canned tomatoes. I do not measure any of my seasonings, so what’s listed in the recipe is just an estimate. Its best to start with the smallest amount listed and add more to taste. Just note that the spices intensify the longer the sauce cooks. Whenever possible use fresh herbs as opposed to the dry stuff; You will just have to use more of the fresh herbs as dry herbs have stronger flavors. A good mix of fresh basil, thyme, and oregano would be perfect!

Great Big Pot of Pasta Sauce

Ingredients:

  • 2 pounds of ground meat
  • 2 medium to large onions, chopped
  • 8 cloves of garlic or 4 tablespoons of minced garlic
  • 1 large can of diced tomatoes
  • 1 large can of petite diced tomatoes
  • 1 large can of crushed tomatoes
  • 1 large can of tomato puree
  • 2 small cans of tomato paste
  • 1 large can of sliced mushrooms (or two regular cans), drained
  • Italian seasoning (~3-4 tablespoons dried or 4-6 tablespoons of fresh)
  • garlic salt (~1-3 teaspoons)
  • sugar (~1-2 teaspoons)
  • 1-2 regular cans of tomato sauce (if necessary)

Directions:

In a LARGE pot over medium to medium high eat, brown your meat. Once the meat is starting to cook, add the onions and garlic and cook until onions are translucent and meat is no longer pink. Drain of as much of the fat as possible. One by one, add each of the 4 large cans of tomatoes and the 2 cans of tomato paste to the meat, onion, and garlic mixture and stir until combined. Once mixed, add the mushrooms and seasonings and stir again to combine. If you like you sauce thinner, feel free to add a can or two of tomato sauce. Cover and reduce heat to medium low and cook for several hours, stirring occasionally. Adjust seasonings as necessary.

Serve hot over your favorite pasta!

One Pot Pasta Sauce

Ingredients:

  • 1 pound of ground meat
  • 1 medium onion, chopped
  • 4 cloves of garlic or 2 tablespoons of minced garlic
  • 1 can of diced tomatoes
  • 1 can of petite diced tomatoes
  • 1 can of crushed tomatoes
  • 1 can of tomato puree
  • 1 small cans of tomato paste
  • 1 can of sliced mushrooms, drained
  • Italian seasoning (~1-2 tablespoons)
  • garlic salt (~1-2 teaspoons)
  • sugar (~1 teaspoons)
  • 1 can of tomato sauce (if necessary)

Directions:

In a large pot over medium to medium high eat, brown your meat. Once the meat is starting to cook, add the onions and garlic and cook until onions are translucent and meat is no longer pink. Drain of as much of the fat as possible. One by one, add each of the  cans of tomatoes and the can of tomato paste to the meat, onion, and garlic mixture and stir until combined. Once mixed, add the mushrooms and seasonings and stir again to combine. If you like you sauce thinner, feel free to add a can of tomato sauce. Cover and reduce heat to medium low and cook for several hours, stirring occasionally. Adjust seasonings as necessary.

Enjoy!

To freeze sauce, let cool to room temperature and pour into freezer-safe containers. When you want to use the frozen sauce, just sit the container out on the counter for the day to thaw for dinner. Pour the cold sauce into a sauce pan, cover, and cook on medium heat until hot.

Much Love,

M

Welcome Yall!

Welcome to my food blog!

Its here that I will try to document all my adventures in the kitchen – whether it be an old family recipe, a Pinterest recreation, or my very own concoction!.

I’m excited to share my recipe box with you!

Much Love,

M